Starting A Web Application Based On ZK CDI JPA and Jetty
Ian YT Tsai, Engineer, Potix Corporation
Aug 29, 2012
ZK 6
Introduction
Building a Java Web application always starts with a bunch of choices: Choices of which software architecture to pick, layers of architecture to define, and possible solutions or frameworks that each layer should use. This is why we welcome a common practice; a "default stack" like "Struts+Spring+Hibernate" in which we can start our project with and further evaluate if this stack fits our requirements or if there are some parts of it needed to be swapped.
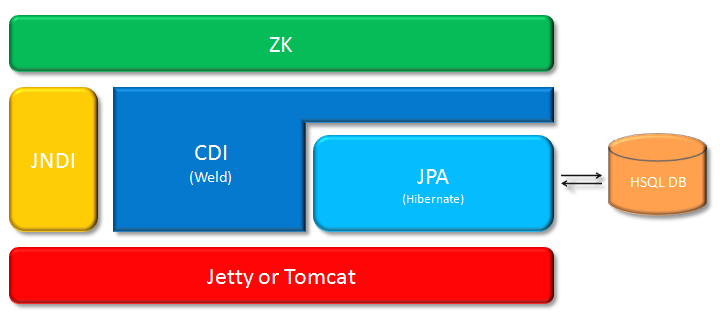
So, in this series of articles, I want to propose a stack which is based on CDI (Weld), JPA (Hibernate) and ZK running on a simple web container (Jetty or Tomcat), which could be a good start for your ZK-based application.
In the first article, I'll introduce the aim of this stack and a little part of Java CDI technology by walking through a development Environment setup and application stack build-up.
In the second article: Practices Of Using CDI In ZK I'll introduce some programming practices to each layer and some possible solutions for common scenarios.
Application Stack Design
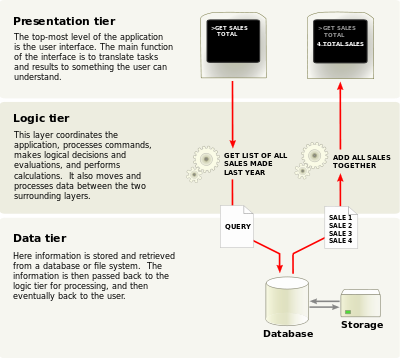
Traditionally, a web application consists of 3 tiers/layers, which are: Presentation, Logic and Persistence(Data).

In our application stack we use:
- ZK as Presentation
- CDI as Logic
- JPA as Persistence(Data)
Now let's see the elements of our stack:

Using light-weight Web Container
I use Jetty rather than a heavy duty application server because:
- Fast to reboot. especially in Eclipse, you can always restart it in 5 secs.
- Popular and friendly to everyone. A lot of people are hesitant to learn CDI because although it's designed for general purposes like Spring, but it is included in Java EE specifications which means that you need to use an application server to play with it. Studying how to use an application server nowadays is not a big problem but the natural barrier is still higher than studying a simple web container.
Based on Java EE
As the default stack of our ZK-based application, using Java EE standard technology in each layer grants you good flexibility to swap the implementation and even the container.
- CDI: we only use Weld here rather than the entire Seam framework because we don't want to make this stack too addicted to vendor specific feature at the beginning. We can always make such decision when we hit by some critical issues that require such features.
- JPA: Hibernate is very powerful and proven to use, we use JPA's interface to access it by default.
In Memory Persistence
in order to start a project as quickly as possible whilst sustaining flexibility when we need better performance and functionality, we use in-memory DB for our default stack. I use HSQLDB here which requires minimal configuration. And because we use JPA as the persistence interface, it is very easy to swap HSQLDB with other DB.
Development Environment Setup
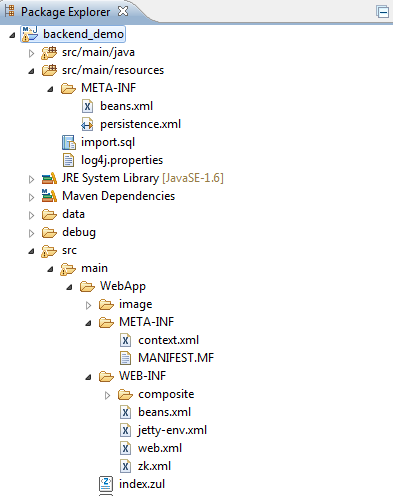
If you are familiar with Eclipse + Maven + Git, you can fork https://github.com/zanyking/smalltalk to your git repo or do git clone git@github.com:zanyking/smalltalk.git /your_space to your local machine, then import the whole stuff into your Eclipse work space. The project in your eclipse workspace should be like this:
If you don't have a proper environment to do so, please read the sections below.
Demo Project Download
There are two ways to download the demo project archive:
- git clone git@github.com:zanyking/smalltalk.git, the demo project is under /CDI_Integration/backend_demo.
- download it from: https://github.com/zanyking/smalltalk/downloads. Unpack the downloadable zip file and get project archive.
Eclipse IDE Preparation
If you don't have an Eclipse IDE, please download Eclipse 3.6 or 3.7 JavaEE Developer's package. Then, please install the required plugins listed below:
- M2Eclipse: in order to minimize the project size and manage the project well, I use Maven to manage my project, and M2Eclipse can help you import the project into your eclipse workspace much easier.
- Run Jetty Run: a very light weight Jetty server runner to host the runtime of your web application.
Project Configuration
Now, let's follow the steps below to import & configure the downloaded project in Eclipse IDE.
- Import project into workspace.
- Import project archive in context menu by mouse right-click in "Package Explorer".
- Select "import...", and choose "Existing Projects into Workspace" then follow the indication to build a reference from project archive to workspace.
- fine tune settings in pom.xml. this article is based on ZK 6.0.2, you can change it by configuring:
  	<properties>
  		<zk.version>6.0.2</zk.version>
  		...
  	</properties>
- Run-Jetty-Run Launch Configuration. please follow the steps bellow:
- In Eclipse, click the drop-down arrow side by "Debug As..." menubar item and select "Debug Configurations...".
- In the opening dialog's left side list, please right-click "Jetty Webapp" and create a new launcher.
- in the configuration content of your RJR launcher, please check "Show Advanced Options", then in "Other configs", check "JNDI Support".
- Click "Debug" and open a browser with URL: http://localhost:8080/backend_demo/ see if you can get the result and check if there are any error messages in console.
Presentation & Logic Layers Setup
This layer defines all the web related part of this application, including ZK and CDI Bean Manager as a JNDI resource. All configuration files of this layer is under: src/main/WebApp/.
ZK Configuration
ZK part of configuration is quite straight-forward, there are two files you need to deal with: /WEB-INF/web.xml and /WEB-INF/zk.xml. You can check ZK Configuration Reference for more details.
CDI JNDI Resource configuration
CDI configuration in Presentation Layer consists:
- Resource Definition in Jetty JNDI. the container specific configuration in Jetty is /WEB-INF/jetty-env.xml, currently I'm using Jetty 6.1.28 and this setting could be very different in Jetty7 or Jetty8.
<Configure id="webAppCtx" class="org.mortbay.jetty.webapp.WebAppContext">
	<New id="BeanManager" class="org.mortbay.jetty.plus.naming.Resource">
		<Arg>
			<Ref id="webAppCtx" />
		</Arg>
		<Arg>BeanManager</Arg>
		<Arg>
			<New class="javax.naming.Reference">
				<Arg>javax.enterprise.inject.spi.BeanManager</Arg>
				<Arg>org.jboss.weld.resources.ManagerObjectFactory</Arg>
				<Arg />
			</New>
		</Arg>
	</New>
</Configure>
- JNDI Resource Declaration. The configuration in /WEB-INF/web.xml is like this:
<resource-env-ref>
	<description>Object factory for the CDI Bean Manager</description>
	<resource-env-ref-name>BeanManager</resource-env-ref-name>
	<resource-env-ref-type>javax.enterprise.inject.spi.BeanManager</resource-env-ref-type>
</resource-env-ref>
with this setting, the application is able to retrieve Bean Manager using JNDI name: java:comp/env/BeanManager
- Weld Environment Initialization. Weld as the CDI implementation we use in this project, it requires environment initialization settings in /WEB-INF/web.xml:
<listener>
	<listener-class>org.jboss.weld.environment.servlet.Listener</listener-class>
</listener>
- WEB-INF/beans.xml This file must exist, otherwise CDI cannot identify if this wab app( a WAR archive) is also a CDI bean archive. Inside of this file we can have some Weld specific settings which will narrow down the package scanning range:
<beans xmlns="http://java.sun.com/xml/ns/javaee"
	xmlns:weld="http://jboss.org/schema/weld/beans"
	xmlns:xsi="http://www.w3.org/2001/XMLSchema-instance"
	xsi:schemaLocation="
      http://java.sun.com/xml/ns/javaee
      http://docs.jboss.org/cdi/beans_1_0.xsd
      http://java.sun.com/xml/ns/javaee/beans_1_0.xsd
      http://jboss.org/schema/weld/beans
      http://jboss.org/schema/weld/beans_1_1.xsd">

	<weld:scan>
        <weld:include name="demo.model.*" />
        <weld:include name="demo.model.bean.*" />
        <weld:include name="demo.web.model.*" />
        <weld:include name="simple.*" />
	</weld:scan>
</beans>
How about Tomcat?
If you'd much prefer Tomcat than Jetty, the only difference is the JNDI resource definition part. There's a couple of ways to define a JNDI resource in Tomcat, such as GlobalNamingResource in server.xml or Context.xml, here I introduce the most simple one, add a META-INF/context.xml in your project web archive, the content of it is as below:
<Context>
   <Resource name="BeanManager"
      auth="Container"
      type="javax.enterprise.inject.spi.BeanManager"
      factory="org.jboss.weld.resources.ManagerObjectFactory"/>
</Context>
How about a Java EE Application Server?
For user who want to try ZK + CDI in an application server which has it's own CDI infra, you have to check out if ZK can access your server's CDI bean manager through JNDI look up. The default JNDI name that ZK used is: java:comp/env/BeanManager. To customize it, please declare a library property in zk.xml like this:
<library-property>
    <name>org.zkoss.zkplus.cdi.beanManager.jndiName</name>
    <value>{your_container_cdi_bean_manager_jndi_name}</value>
</library-property>
Persistence Layer Setup
In persistence layer, we use Hibernate as our JPA implementation.The JPA configuration is named persistence.xml and must be located in META-INF/ while classpath resolves. In this demo project we put it in src/main/resources/META-INF/persistence.xml, The configuration of it is shown below:
<persistence xmlns="http://java.sun.com/xml/ns/persistence" version="2.0">
	<persistence-unit name="breakfast" transaction-type="RESOURCE_LOCAL">
		<provider>org.hibernate.ejb.HibernatePersistence</provider>
		<properties>
			<property name="hibernate.dialect" value="org.hibernate.dialect.HSQLDialect" />
			<property name="hibernate.connection.driver_class" value="org.hsqldb.jdbcDriver" />
			<property name="hibernate.connection.username" value="sa" />
			<property name="hibernate.connection.password" value="" />
			<property name="hibernate.show_sql" value="true" />
			<property name="hibernate.connection.url" value="jdbc:hsqldb:file:data/store" />
			<property name="hibernate.hbm2ddl.auto" value="create-drop" />
		</properties>
	</persistence-unit>
</persistence>
For the configuration, I defined a persistence unit named "breakfast" which uses Hibernate HSQLDialect to initialize & connect a HSQL DB. To get this persistence unit in application, you can write code like this:
EntityManagerFactory factory = Persistence.createEntityManagerFactory("breakfast");
EntityManager em = factory.createEntityManager();
Then, when you create the EntityManagerFactory, Hibernate will do the ORM reflection mechanism which will scan and use your given java entity class to generate DB table, and restore the initial data from src/main/resources/import.sql.
Next Article: Practices Of Using CDI In ZK
In the next article: Practices Of Using CDI In ZK, we will start to look at the programming and design practices by using a demo app: Order Management System for example.
Comments
| Copyright © Potix Corporation. This article is licensed under GNU Free Documentation License. |
